



Instructions - Extend Himo to Tare and Hakama by yourself
To extend the existing Himo it turned out to be a good idea to connect both pieces of fabric with a diagonal seam.
A vertical seam cannot long resist the tensile forces that occur during tying and will loosen again over time.
Determining the length of the new Himo:
The new Himo should e.g. For example, if it is longer than 40 cm, take 40 cm plus the unfolded width of the old Himo (here 12 cm), plus 3 cm for the end of the Himo. So the piece of fabric you will sew on should be 55 cm long.
At the end of the existing Himo, separate all seams and stitches by approx. 20-25 cm and unfold the fabric.
Match the width of the new piece of fabric to the existing Himo..
.svg)
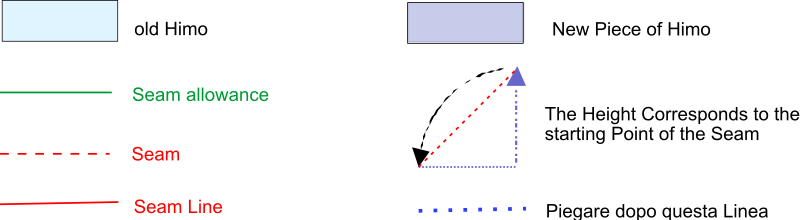
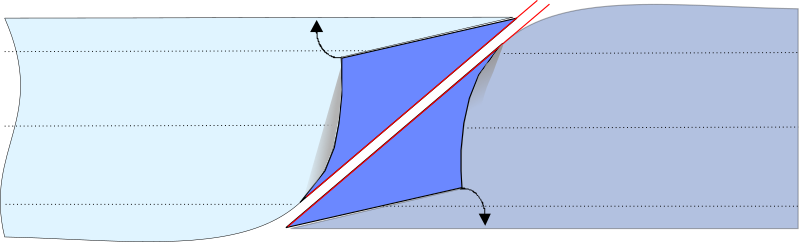
If the fabric pieces are next to each other, as shown here, determine the stitching line (-----red line) by taking the bottom right corner of the old himo and folding it. The entire previously vertical outer edge then lies horizontally on the upper edge.
Draw the diagonal line you just created (red line), this is the stitching line.
With the new Himo you do the opposite. This means that now take the top left corner and fold it over the bottom edge of the fabric.
Also draw this newly created diagonal line and place it exactly on the diagonal edge of the old Himo.

Now sew both himo pieces together along the diagonal red line.
Then cut the folded pieces of fabric along the green lines (--------) at a distance of approx. 1.5 cm from the seam.
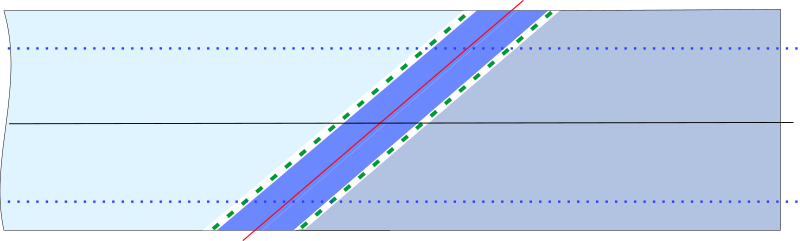
Press the seam flat using the seam allowance.

At the end of the new Himo, the vertical edge is bent inward by three centimeters.
Now fold the horizontal outer edges of both Himo parts inwards at the top and bottom.
Finally, all the seams on the two Himo are closed and the stitching continues on the new piece of fabric to the outer edge.

This is what the Himo should look like after the extension.
A vertical seam cannot long resist the tensile forces that occur during tying and will loosen again over time.
Determining the length of the new Himo:
The new Himo should e.g. For example, if it is longer than 40 cm, take 40 cm plus the unfolded width of the old Himo (here 12 cm), plus 3 cm for the end of the Himo. So the piece of fabric you will sew on should be 55 cm long.
At the end of the existing Himo, separate all seams and stitches by approx. 20-25 cm and unfold the fabric.
Match the width of the new piece of fabric to the existing Himo..
If the fabric pieces are next to each other, as shown here, determine the stitching line (-----red line) by taking the bottom right corner of the old himo and folding it. The entire previously vertical outer edge then lies horizontally on the upper edge.
Draw the diagonal line you just created (red line), this is the stitching line.
With the new Himo you do the opposite. This means that now take the top left corner and fold it over the bottom edge of the fabric.
Also draw this newly created diagonal line and place it exactly on the diagonal edge of the old Himo.
Now sew both himo pieces together along the diagonal red line.
Then cut the folded pieces of fabric along the green lines (--------) at a distance of approx. 1.5 cm from the seam.
Press the seam flat using the seam allowance.
At the end of the new Himo, the vertical edge is bent inward by three centimeters.
Now fold the horizontal outer edges of both Himo parts inwards at the top and bottom.
Finally, all the seams on the two Himo are closed and the stitching continues on the new piece of fabric to the outer edge.
This is what the Himo should look like after the extension.
Welcome back!

Our previous price 160,00 € Now only 144,00 €-10%
19 % VAT incl. excl. Shipping costs
special offer valid until: 03/10/26 Manufacturer
Quick purchase
Contact


kendo-sport - Der kompetente Kendo-Onlineshop. © 2026 | Template-Basis by andreas-guder.de